A few weeks ago I signed up for my first ever sewing swap. It's a bag swap. The girls that have signed up have each received a person to sew a bag for. No-one knows who is sewing for who. Some girls have specified their likes and dislikes for what they hope to receive, others have simply asked that the person sewing for them chooses a pattern and fabric they love and to have fun with it.
I have finished my bag for the swap. Since I've only been sewing for a few months I decided to do a trial bag and have since finished my *real* bag for the swap. I'm really happy with it and hope my person likes it. I am dying to post some pics and run through the love/hate relationship I had with my bag but can't reveal anything until opening day, Friday 10th July. Some of the girls in the swap have posted sneak peaks on their blogs but since I've always been able to leave the presents under the tree until Christmas morning, I will wait until the 10th.
Arghhh No Internet!!
It's only been a few days but oh how I miss my internet. We won't have access at home until Wednesday so here I am getting a fix on a friends computer.
What is the upside of having no internet? Getting those boring little sewing jobs out of the way. This morning I had a pile of bitsy things to do, tonight it's gone!!
* I patched hubby's work jeans which truly have seen better days but alas, another patch has been added.
* I chopped the feet off H's fleecy sleepsuit and hemmed them so now they should last the winter.
* The elastic had gone in one of M's dress up princess skirts. Fixed, then worn for the rest of the afternoon (by her, not me LOL)
* 2 buttons sewn back on to M's school tunic. Old me would have done it the night before school started back, yay for me :-)
I don't get much sewing done when the kids are around unless I choose to sew with interruptions. They were pretty good this afternoon so when they both wanted to try some sewing I decided to encourage their interest in it. M has had a few goes on the machine before but of course H hasn't, he's only 2! I put the foot pedal on one of the kids little chairs so H could reach it and he actually did really well. The 2 bits of scrap fabric I cut for M ended up as a bag, she stitched all 3 sides and I added a handle for her. I'm so proud of her, she made her first bag! Here it is....

A Quick Scarf
* Lots of polar fleece lying around. (Can't even remember why I bought so much in the first place??)
* Perfect colour match for M's school uniform.
* Quick and easy but it did require an attempt at a blind stitch which bored me after a few minutes so it's not perfect but looks quite ok.
* Result - a nice long, warm scarf for those chilly days when M has to be outside.
* Proudly modelled by H!


* Perfect colour match for M's school uniform.
* Quick and easy but it did require an attempt at a blind stitch which bored me after a few minutes so it's not perfect but looks quite ok.
* Result - a nice long, warm scarf for those chilly days when M has to be outside.
* Proudly modelled by H!


Lazy Days Skirt 3 & 4
Lazy Days Skirt numbers 3 & 4 and maybe the last for a while (maybe?). I love them all. I was really happy with both of these, I love the fabric, the colours, the ribbons...I hope the lucky birthday girl enjoys them and since she put one on straight away, I'm sure she will!
FRONT - I don't think the photo does justice to the true electric blue colour of the ribbon, it's so much better in real life

Showing the BACK, I tried to make the ribbon fold over neatly and be somewhat in proportion to the seam as opposed to my effort with the pink LD skirt. I was happy enough with this effort.

FRONT - I love the colours of this skirt and am so pleased I went with an orange ribbon for the hem - gorgeous!
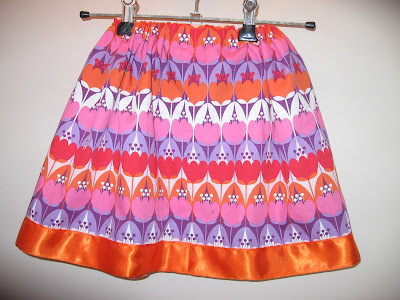
The BACK almost matches up (it was a fluke). I found it so much easier using fabric with a consistent, even pattern, it made it even quicker to make than usual.
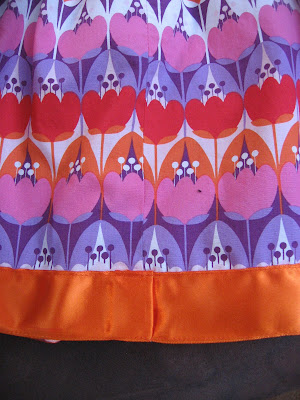
Scuze the black fluff on the skirt!
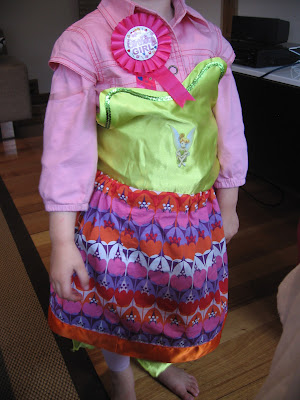
And here is the birthday girl in her new skirt. I'm glad she opened our present last because she kept wearing her presents as she opened them and as you can see, the skirt was the 3rd layer LOL
FRONT - I don't think the photo does justice to the true electric blue colour of the ribbon, it's so much better in real life

Showing the BACK, I tried to make the ribbon fold over neatly and be somewhat in proportion to the seam as opposed to my effort with the pink LD skirt. I was happy enough with this effort.

FRONT - I love the colours of this skirt and am so pleased I went with an orange ribbon for the hem - gorgeous!

The BACK almost matches up (it was a fluke). I found it so much easier using fabric with a consistent, even pattern, it made it even quicker to make than usual.

Scuze the black fluff on the skirt!
And here is the birthday girl in her new skirt. I'm glad she opened our present last because she kept wearing her presents as she opened them and as you can see, the skirt was the 3rd layer LOL

Finally It's Finished
And I couldn't be happier! This project dragged on way too long.
I avoided working on it for fear of things like buttonholes which, as you can see, I avoided completely and cheated by using press studs. The interfaced insert doesn't quite fit properly and that definitely put me off working on it further.
On the flipside, I love my hemming effort and I love how the pink press studs turned out. I picked them up, along with a nice strong tool to replace the plastic one I used on the change wallet, at Lincraft so I guess that place is good for something! The new tool makes it easier to put the studs in too.


And I will add some action shots tomorrow of M in her new dress. Edited 2/7 to finally add a photo of M in her dress.

Subscribe to:
Posts (Atom)